





Adventure Namibia – the perfect flexible self-drive tour from Windhoek

Discover the beauty of Namibia on your own
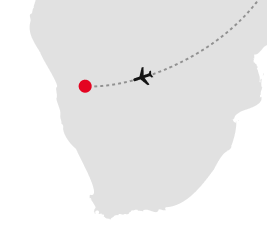
Namibia – a land of contrasts, vastness and nature. This scalable self-drive tour from Windhoek takes you to the highlights – whether you have one week or three. All stages are designed to be between 150 and 400 kilometres long. Those who are short on time can drive one stage per day (=7 days), while those with more time can stay longer. We also provide tips for further activities in the area.


From Windhoek to Spreetshoogte Pass (200 km)
The journey begins in the central highlands of Namibia and continues to the Namib Desert. Would you like to make a stop along the way? The Khomas Highlands offer many hiking trails, and with a bit of luck, you may see oryx antelopes or kudus. The highlight is the viewpoint at Spreetshoogte Pass, which offers a spectacular view of the seemingly endless Namib Desert, especially beautiful at sunset. Overnight stay: Spreetshoogte Campsite.

From Spreetshoogte to Sesriem (150 km)
From Spreetshoogte, the route continues to Sesriem Canyon in Namib-Naukluft National Park, but only with a permit. The name comes from the fact that early settlers had to tie six leather straps (Afrikaans: ‘ses rieme’) together to draw water from the 30-metre-deep gorge after the rainy season (January to March). The descent reveals fascinating rock layers – perfect for hiking, with or without a local tour guide.


Giant dunes in Sossusvlei and Deadvlei
White plains with dead trees surrounded by bright red dunes – an iconic Namibian motif. This can also be found in Namib-Naukluft National Park, near the famous Sossusvlei and Deadvlei salt pans, not far from Sesriem Canyon. The Namib is home to the highest dunes in the world: Big Daddy, Big Mama, Dune 45. Tip: Climb the dunes early in the morning, then explore the salt pans.


From Sesriem via Solitaire to Swakopmund (350 km)
In the charming little village of Solitaire, alongside a petrol station and numerous car wrecks peeking out photogenically from the sand, you will find the iconic Moose McGregor's Desert Bakery. A slice of the famous apple pie is a must on the way to Swakopmund. The route takes you past bizarre rock formations at the Gaub Pass and the Kuiseb Canyon, where the northern and southern Namib meet.


Colonial architecture in Swakopmund
Swakopmund's colonial past is still visible today: half-timbered houses such as the Woermannhaus and the neo-baroque Hohenzollernhaus are now landmarks of the town, which is an ideal base for excursions into the surrounding area. The Swakopmund Museum teaches visitors more about the town's history, and the Crystal Gallery is also worth a visit. At sunset, we recommend a walk along the beach promenade to the Old Jetty pier.


Excursions from Swakopmund: Walvis Bay and Sandwich Harbour
An unforgettable destination from Swakopmund is Sandwich Harbour, where high dunes plunge directly into the Atlantic Ocean. The best way to experience the spectacular natural surroundings is on a guided 4x4 tour through the dunes. Popular activities include sandboarding and quad biking. Those who prefer water can take a boat trip to Walvis Bay: a lagoon full of flamingos, dolphins and seals.


From Swakopmund via Cape Cross to Uis (230 km)
Seal enthusiasts make a detour to Cape Cross, about 100 kilometres north of Swakopmund in Dorob National Park, on their way to Uis. A colony of 100,000 Cape fur seals lives here right on the Atlantic coast. In addition to this natural spectacle, a cross commemorates the landing of the Portuguese explorer Diogo Cão in 1486. Tip: the smell of the seals is intense, so a scarf or shawl is recommended!


From Uis to Twyfelfontein (145 km)
From the coast, we head back inland. The highlight of this stage is the Brandberg Massif, the highest mountain in the country. Guided hikes allow you to discover the rock painting of the ‘White Lady’; many of the thousands of years old works can be explored on walks. Shortly before the destination, the Damara Living Museum awaits, where the Damara, one of the indigenous groups, provide insights into their culture.


Twyfelfontein World Heritage Site
There is also plenty to see in Twyfelfontein itself: the Organ Pipes are a formation of basalt columns that look like giant organ pipes. Next to them lies Burnt Mountain, whose dark rock glows in spectacular colours at sunrise and sunset. The highlight is the rock engravings: over 2,500 symbols and animal depictions are part of the World Heritage Site and bear witness to the millennia-old culture of the San people.


From Twyfelfontein to Etosha National Park (300 km)
The journey to Okaukuejo and Anderson Gate in Etosha takes you through Damaraland. At Khorixas, the Ugab terraces rise up from the landscape – ideal for a short hike or picnic. With a bit of luck, you may encounter desert elephants roaming freely through the dry riverbeds. The landscape of red rocks, wide plains and small villages makes the journey an experience in itself.


Spectacle in Etosha National Park
Etosha National Park is one of Namibia's highlights, mainly because of its huge salt pan, which turns into a bird paradise after rain. Elephants, lions, rhinos and giraffes can be observed up close at the waterholes. The landscape and infrastructure make Etosha ideal for self-drive tours and safari fans, and guided tours are also available. The best time to visit is from June to September.


From Etosha to Windhoek (420 km)
There are several worthwhile stops on the journey from Etosha National Park to Windhoek. Near Otjiwarongo, the Cheetah Conservation Fund offers fascinating insights into cheetah conservation. Those interested in dinosaurs can discover real dinosaur footprints at Otjihaenamaparero. Shortly before your destination, the Gross Barmen Hot Springs invite you to relax before you arrive back in Windhoek.
Header - Photo by Drepicter on Adobe Stock
Paragraph 1 - Photo by VisualStories on Getty Images
Paragraph 2 - Photo by Nadine on Adobe Stock
Paragraph 2 - Photo by LUC KOHNEN on Adobe Stock
Paragraph 3 - Photo by Massi Arezki on Adobe Stock
Paragraph 4 - Photo by Mint Images RF on Getty Images
Paragraph 4 - Photo by francoisloubser on Adobe Stock
Paragraph 5 - Photo by Jose on Adobe Stock
Paragraph 5 - Photo by caughtinthe on Getty Images
Paragraph 6 - Photo by JEAN on Alamy Stock Photo
Paragraph 6 - Photo by majonit on Adobe Stock
Paragraph 7 - Photo by Delphotostock on Adobe Stock
Paragraph 7 - Photo by Marco Bottigelli on Getty Images
Paragraph 8 - Photo by Eisenlohr on Getty Images
Paragraph 8 - Photo by dpreezg on Adobe Stock
Paragraph 9 – Photo by Luis on Adobe Stock
Paragraph 9 – Photo by Vladimir Zhoga on Shutterstock
Paragraph 10 – Photo by GetAbroadPhotography on Adobe Stock
Paragraph 10 – Photo by artepicturas on Adobe Stock
Paragraph 11 – Photo by Jason Busa on Adobe Stock
Paragraph 11 – Photo by Bill on Adobe Stock
Paragraph 12 – Photo by F.C.G. on Adobe Stock
Paragraph 12 – Photo by Nick Dale on Adobe Stock
Paragraph 13 – Photo by Hoberman Publishing on Alamy Stock Photo
Paragraph 13 – Photo by Daniel on Adobe Stock